Wednesday, February 4, 2026
Saturday, January 31, 2026
Thursday, April 27, 2023
Photo Retouch in the Advertising Industry
Photo retouching has become a staple of the advertising industry. It is used to perfect and enhance the visuals of a product or service, and to create an attention-grabbing, aesthetically pleasing look. In an age of digital media, photo retouching can help a business to stand out from the competition and get noticed by potential customers.
What is Photo Retouching?
Photo retouching is the process of editing an image to enhance its appearance and make it more aesthetically pleasing. It is often used to remove blemishes, correct lighting and color issues, remove distracting elements and add special effects. Photo retouching helps to create an image that communicates the message of the advertisement in a more effective way.
What are the Benefits of Photo Retouching?
Photo retouching can help to turn an ordinary image into something extraordinary. By applying a few digital edits, a photo can be transformed into a work of art that draws in viewers and compels them to take action.
Photo retouching can also help to improve the quality of an image, making it appear more professional and polished. This can help to create a better impression of the product or service being advertised, and thus increase the chances of success for the advertisement.
How is Photo Retouching Used in the Advertising Industry?
Photo retouching is used extensively in the advertising industry, from creating print and digital advertisements to producing product packaging and television commercials.
Photo retouching can be used to create attention-grabbing visuals that draw in potential customers. It can be used to touch up and enhance images to make them look more professional and polished, as well as to remove distracting elements and add special effects.
Photo retouching can also be used to create composite images, which can be used to showcase a product in the best light. By combining multiple images together, a composite image can be created that shows the product or service in a more appealing way.
What are the Challenges of Photo Retouching?
Although photo retouching can help to create stunning visuals that draw in viewers, it can also be a challenge. It requires a good eye for composition, color, and lighting, as well as a strong understanding of digital editing software.
Photo retouching must also be done in a way that is ethical and responsible. It is important to ensure that any retouching is done in a way that does not deceive viewers or misrepresent the product or service being advertised.
Conclusion
Photo retouching is an essential part of the advertising industry. It can help to create stunning visuals that draw in viewers and compel them to take action. However, it is important to ensure that any retouching is done in an ethical and responsible way. With the right tools and skills, photo retouching can be used to create stunning visuals that can help to increase the success of an advertisement.
Tuesday, May 22, 2018
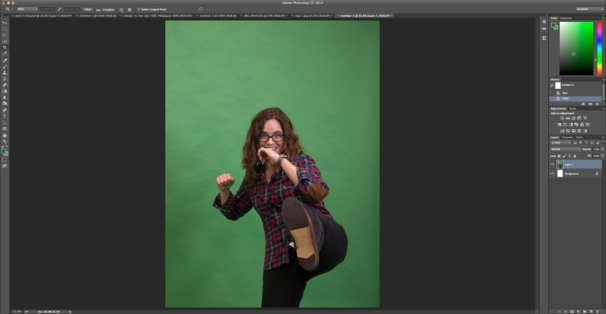
How to: Remove Green Screen Background in Photoshop
- Open up your green screen background image
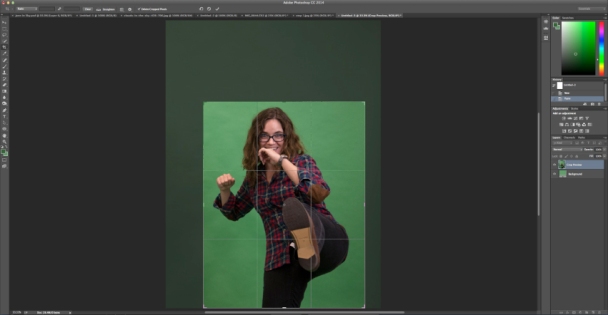
- Use the crop tool to remove any unwanted items in the image and/or simply crop out excess space. Click the checkmark or press ENTER when you’re done.
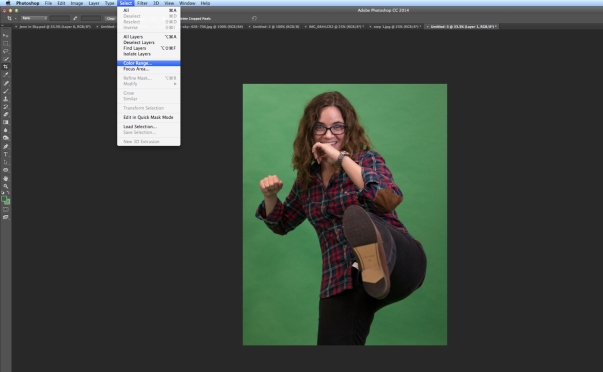
- Go to Select and click Color Range.
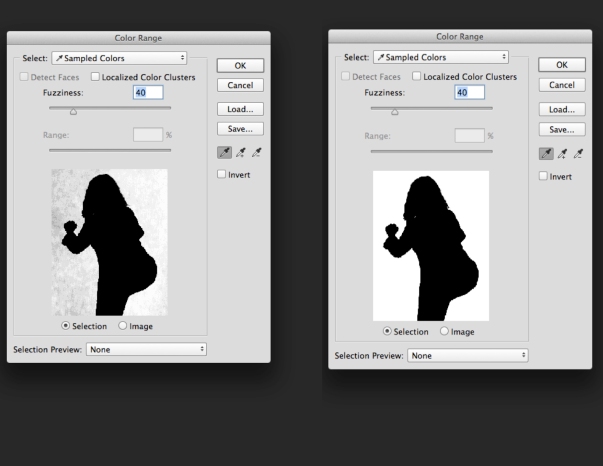
- Use the eyedropper tool that appears, hold down the SHIFT key while clicking and dragging around the green areas you need to remove, ideally the background in the popup color range box should become white. If you think you’ve removed too much, hold down the ALT key and click on the area where you want to deselect. Click OK when you are happy with the selection.
- Go to the Select and choose Inverse.
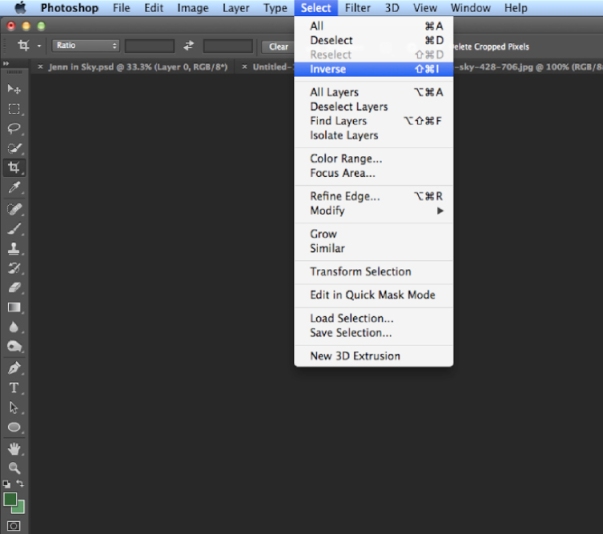 <
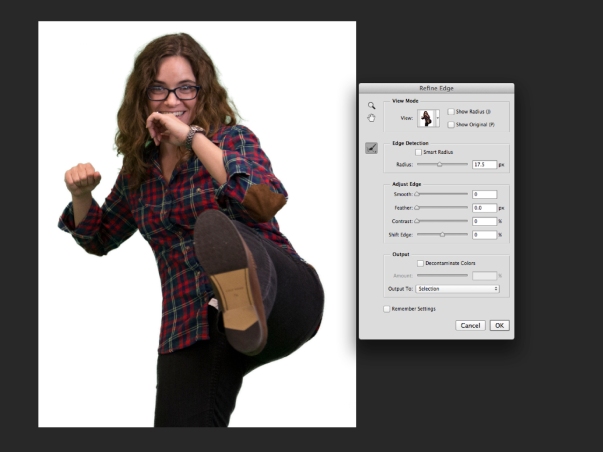
< - Go to Select again and click Refine Edge…
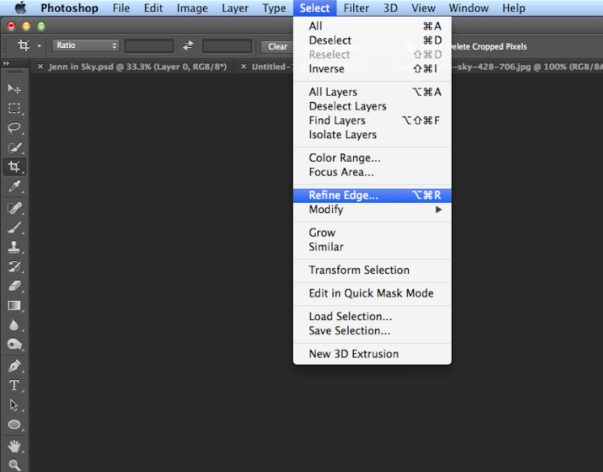
- Use the various sliders to adjust the smoothness of the edge of your cutout. Select OK when you are happy with how the selection looks in the preview. You can also click on the image and drag on any remaining green shades to fade it out.
- Go to Select and click Inverse, again.

- Press the DELETE or BACKSPACE button on your keyboard to delete the green background.
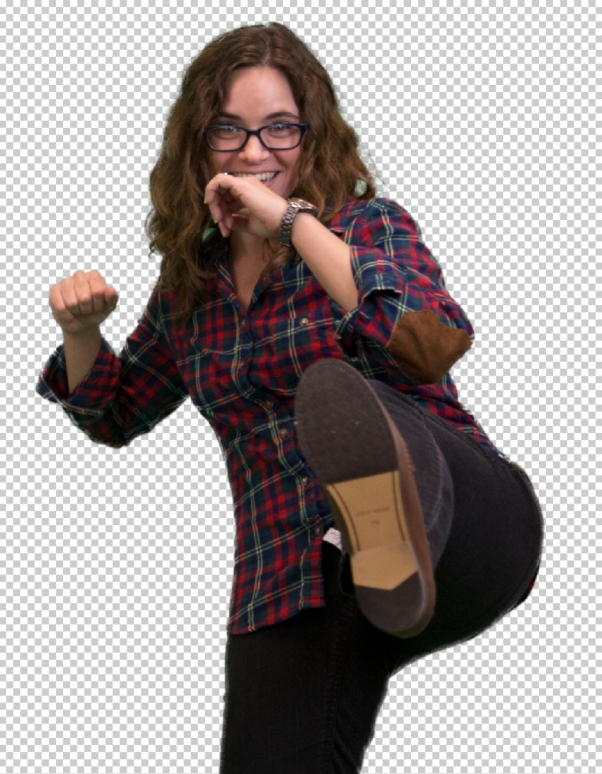
- Drag or copy and paste your image into a background you want, have fun!


Learn how to retouch your product shots in Photoshop
In this tutorial, we show you how to clean up and retouch photos of products to a professional standard
Advertising campaigns attract consumers to the professional images of their products. With all commercial photography, it is an important step to ensure each image as a good quality and high standard for print. Using software such as Photoshop in such industries and using similar tools and techniques, one professional results can easily be obtained at home using your own photographs.
In this tutorial, we would like to show you that using Photoshop CS8 to improve a product shot like the professionals and the image of a bottle of perfume shot. Glass objects can be extremely difficult to light and photograph, with distracting reflections and refractions, which can often prove to be difficult to improve or remove post-production. However, by using some simple adjustment techniques in Photoshop, we will show you how to correct, improve and enhance your shots, improve the overall image exposure and contrast as well as insert unwanted colors and remove dust particles For, to see as consumers again
Follow with our simple step-by-step guide and implement some of our basic improvement tips, which can help you get high-quality product shots results that will not appear in the portfolio of any of the profiles.
Step 1: Create a new layer

Open up your product photo file in Photoshop. In the Layers palette, duplicate the original layer by Ctrl/right-clicking on the Background layer and selecting Duplicate Layer. Rename this new layer ‘Exposure correction’.
Step 2: Cropping in

Select the Crop tool from the Tools bar and click on the top corner of the image, dragging the crop cursor diagonally down to the opposite bottom corner. Holding the Shift key to keep the original proportions, pull up the bottom corner cursor, cropping out the edges until you’re happy with the position of the perfume bottle in the frame.
Step 3: Adjust levels

Open a Levels adjustment layer to make corrections to the overall image exposure (Image>Adjustments>Levels). Begin by pulling in the slider on the left-hand side (Highlights) of the histogram to where the mountainous range begins to gain height. Now move the midpoint (greys) slider along to create a punchier contrast.
Step 4: Clean up

Now create another new layer titled ‘Clean-up layer’ and select the Clone Stamp tool that is located in the Tools bar. Adjust the brush settings so it has soft edges and is sized proportionately to the dust spots that you want to remove (you may need to alter this as you go). Keep the Opacity at 100%.
Step 5: Cloning out

Zoom in to check for obvious marks and spots. Using the correctly sized Clone Stamp tool select the area next to the mark; holding down the Opt/Alt key to select the clean area (for each flaw), place the cursor over the mark you wish to remove and press down to clone it out.
Step 6: Masking

For harder-to-remove dust marks on reflective surfaces cut out the area using the Quick Mask mode (press ‘Q’ on your keyboard for a shortcut). Select the Brush tool with 100% Opacity and paint the area, using the Eraser tool to correct any errors. Hit ‘Q’ to preview the selection line and, when happy, go to Layer>New>Layer via Copy (or Cmd/Ctrl+J) to create a cutout of what you have masked.
Step 7: Remove finer dust

Select your new cutout layer and go to Layer>Filter>Noise>Medium and blur the pixels with a 8px Radius, or thereabouts. Now adjust the Opacity of the layer to around 80%. Edit the layer by first selecting a Darken blending mode and then Linear Dodge (Add). You can reduce the overall layer opacity if you need to.
Step 8: Replace color

Even out the background colour by selecting Image>Adjustments>Replace Color. Use the Eyedropper tool and click on the darkest background area (eg the right-hand corner), drag the Lightness slider up to brighten out the dark regions and create an evenly white background. Make sure you zoom into your image and check that the white is the right brightness and blends with the already existing white background colour.
Step 9: Colour correction

Remove the warmer tones from the bottle and bring out the blues using the Color Balance adjustment layer (Image>Adjustments> Color Balance). Enable Preserve Luminosity and begin working your way through the sliders, adjusting through the Highlights, Midtones and Shadows. Continually toggle the Preview button on and off so that you can see the modified results as you go along. Remember, you don’t have to make adjustments with every slider; work gradually for best results.
Step 10: Final touchups

Zoom into your image and check for any unwanted marks you may have missed that still need to be cloned out. If you want to make further adjustments to the tonal range in the bottle use the Replace Color adjustment again and select a light blue area. Lighten this using the Lightness slider slowly to avoid cut-out-like results.
Step 11: Contrast and flatten

For a final contrast, boost the use a Shadows/Highlights adjustment layer. Really push the Midtone Contrast slider for the best results. When happy with the final look save the layered file separately as a PSD file in case you wish to go back and edit further. Now flatten your final image layers (Layer>Flatten Image).
Step 12: Sharpen up

Before you save your final image make sure it is sharp, adding definition to edges and improving the overall quality. Go to Filter> Sharpen>Unsharp Mask and activate the Preview button to monitor the effect. Up the Amount to 100% with Threshold at 0 levels and bring the Radius up slowly to around 2.6px.
Step 13: Resize

Now you’ve made the last tweaks you’ll want to resize it for web or print use. For a good-quality print, you will need to increase the image resolution to 300dpi (go to Image>Image Size>Resolution). For web use, decrease the resolution to a smaller value such as 72dpi.
Step 14: Saving

Remember to watermark your images before you upload them to ensure they are copyright protected. Once your work has been correctly resized to suit your output you should save the final image as a JPEG file (File>Save As>Format: JPEG) and then print out for your portfolio or upload it to your online gallery.
- For we offer the lowest price for product photo editing service
- We guarantee to produce the best results of the demands and requirements of our customers.
- We have gained a great understanding of the needs and requirements of our customers with the best service of thousands of client servers and background correction services worldwide.
- We offer a complimentary FREE TRIAL SERVICE for our customers, to ensure the quality and outlook of the product photo editing.
WHY PRODUCT PHOTOGRAPHY SHOULD BE A PRIORITY FOR YOUR BUSINESS
